Pages

Sunday, June 30, 2013

Best Guacamole EVER!


So I've got to tell you, I'm loving this summer weather!  Although it's been in the 100's for the past couple days, and will continue throughout the week, I am a heat lover!  But the heat isn't the only thing that gets me excited about Summer.. So does the FOOD!  I have never taken a more popular dish to a BBQ than some good ole Guacamole!  And this recipe will have your friends and family begging you to bring it again..

Ingredients

2 large avacodoes 
1/2 large lime juiced
1 handful cilantro chopped
1 tomato diced
1/2 can sweet corn
1/2 white onion chopped
1 tbsp minced garlic
1/2 tsp cayenne pepper
1 tbsp butter
salt to taste
 
Okay, so first you need to saute the corn and onions.  Throw them in a pan with the tablespoon of butter, cayenne pepper, and 1/2 of the garlic.  Get it nice and browned.. this is what will bring out some amazing flavors in your dish!  If you're wanting to go all out, you can grill fresh corn on the cob and cut if off.  I chose to use canned corn, since that is what I had at the time, and it still turned out amazing!

 Once you have your corn and onions all grilled/sauteed up, transfer it to your dish.  Next throw in your diced tomato, chopped cilantro, and remaining garlic.  Now you can scoop out your fresh avocado into your dish, and squeeze the lime juice onto everything.  Add the desired salt, and then mix everything together, leaving large chunks of the avocado!  I love to have big bites of avocado in my guacamole!  YUM!

 Serve with your favorite chips, and enjoy!


It's fresh, hearty, and full of flavor!

I hope you try this recipe out!  What are some of your favorite BBQ or Summertime recipes?  I am always looking to add some to my go to recipes!  Have a great day and thanks for stopping by!!

Thursday, June 27, 2013

DIY 4th of July Candy Firecrackers

Check out these adorable 4th of July Candy Firecrackers!  These were so easy to make and if you're looking for a cute party favor to hand out at your bbq or party, these are PERFECT!  


All you need is:

4th of July themed scrapbook paper
candy bars/lifesavers
candle wick (I bought 18 feet for under 3.00 at Hobby Lobby)
tulle
decorative sparklers
hot glue gun and glue sticks
tags (optional)

To start, just cut the paper to the size of your chosen candy bar, and wrap it up in it, securing it with hot glue.  You might want to try wrapping one before you cut so you have a good idea for the paper.  I did three wrapped candy bars per bundle.  Hot Glue them together and then insert the sparkler into the middle.  Wrap the bundle with tulle, and you're done!!  Isn't that easy peasy?  If you would like to make a tag to go with it, simply create one on publisher or your chosen design software, print it out, hole punch, and loop the tulle through and tie your bow. 


I hope you get a chance to try this out!  Are you already making fun 4th of July themed favors for you party?  I would love to hear what you create!  Thank you for visiting and your questions and comments are ALWAYS welcome!

Saturday, June 15, 2013

Drab Turned Rustic Chic Desk and New Shop Photos!

I can't believe it's already Saturday!  I feel like time is literally running from me.. Do you ever wish you could just slow like down a little?  Especially when the weather is AWESOME!  And the kids are still kids.. It just goes too fast.

So today I am sharing a cute little desk I restored yesterday.. It started out so grungy but I saw potential just hiding underneath all of the yuckiness.. not a word?  I know..  :)

 Now this picture below doesn't show how disgusting this piece really was.. 


Here's a better shot.. the legs were all chewed up.  So I took my palm sander and sanded the heck out of them!  It gave them a different shape, but I feel that it just adds to the character of this cute little desk.
 

Yikes!  Do you see that??  It's left over felt!  The whole top of this desk was covered with green felt!  Dirty felt might I add. 
  

Awe.. So much better!
 

I left some of the wood showing through when I painted it.  It got a nice coat of my homemade Chalk Paint.


It's petite, but cute!  You really could use it as a desk or a vanity.
 

New Items In My Shop!

Just a few quick pictures for you!


Well, I hope you find yourself having a great day!  I will be enjoying my family and pups on a nice walk to the riverside later on.. Thanks for stopping by!


Thursday, June 6, 2013

Juicy Chops with Tomato and Feta Chutney


Okay, so today I am sharing a new favorite recipe of mine!  It is packed with savory flavors that will have your mouth watering when you think about this recipe!  It's actually pretty simple too, so here it goes...


First, preheat your frying pan {I use my cast iron, LOVE IT!} and olive oil to medium-high heat.  While that is heating up, mix together pepper, garlic powder, and dried basil.  Sprinkle the seasoning generously on the boneless pork chops, and lay in the pan. 


Sear the meat for about 4 minutes on each side.  You want a nice golden brown, but be careful not to overcook the meat!!  Remember, these are JUICY chops! :)  After you have flipped the chops, drizzle the lemon juice on top.


While the chops are cooking, dice up your vine tomato.


After you remove the chops, turn down the heat to medium, and add your diced tomatoes to the left over chop juices.  Add the lemon juice, minced garlic, salt and pepper, and fresh basil.


Remove the tomatoes from the pan when they are tender and fully heated, and transfer to a serving bowl.  Add in the 1/2 cup of feta cheese, give it a stir and  it's done!  A delicious Tomato and Feta Chutney!  YUM!  

Just spoon the mixture over the pork chops and you have your flavor packed Juicy Chops Topped with Tomato and Feta Chutney.  Basil garnish optional, but pretty!  This pairs so great with my Greek Summer Salad!  I'll be posting that recipe soon :)


I hope you get a chance to make this one!  I would love your feedback if you do!  

Have a great day, and thank you for visiting my blog!

Linking up at

Saturday, June 1, 2013

Antique Dresser

Greetings Everyone!  I hope you are all enjoying some awesome weather now that it's JUNE!!  Can you believe it's already June?  I feel like it was beginning of March yesterday and here we are!  Not that I'm complaining or anything.. anyone who knows me, knows that I LOVE Summer and everything that comes with it, okay, minus the water bill!

So today I'm showing the after of my lovely five drawer antique dresser.. I am so sorry I don't have a before picture!  I honestly can't believe I didn't snap one!  So not like me.

I painted the dresser with a pretty light blue and added the homemade mixture of household items to make it into Chalk Paint.  All of the accents and carved appliques are painted in a creamy white. 


The top is stained in a gorgeous Mahogany!  It's just beautiful :)

I just LOVE all of the appliques on this dresser.. 

  
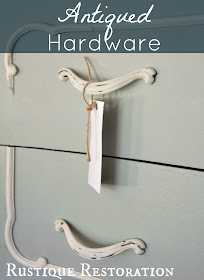
I hand painted the hardware with the same creamy chalk paint that I used on the appliques.  I then just distressed them a little and put on a nice coat of wax.


That sums up this lovely dresser!  Thank you for visiting and your comments are always welcome!  Have a great day!
Linking up at: