Pages

Wednesday, November 27, 2013

French Inspired Chalkboards & an Oak Trestle Table

Holy Cow!! Is it really the day before Thanksgiving??  Is it just me, or does anyone else out there feel like this season is just flying by as we blink our eyes?  Although I feel like its going too fast, I am SUPER excited for tomorrow!  I crave this dinner several times through out the year, and usually end up making it a few weeks before Thanksgiving, I know I'm crazy!  But that's how much I love it!  

Okay, now onto the chalkboards.. I made a few new ones a couple days ago and just took them to the shop yesterday.  Making chalkboads is actually a really easy process, especially if you make multiple at the same time.  I usually bring in a big work table, and set up my workshop.  So for my chalkboards, I pick up a 1/4" 4x8 sheet of masonite board.  You can find this at Home Depot or Lowes.  You can measure your frame openings ahead of time and have them cut to size.  They are really great about that!  Next you need to grab a quart of the roll on chalkboard paint.  You can use the spray cans as well, but I have never used them, so I stick to the roll on, plus it last me a long time.  Grab a small hand roller and some small foam rollers.  I roll on three coats, letting it dry in between each coat.  So for the frames, you can find frames just about anywhere.. home decor stores, garage sales, thrift stores.. I love to find a great deal on one that I can make my own.  After you have three coats dry, you can then pop it into your ready frame and secure it as necessary.  So pretty simple once you done one.  Here are a couple that I finished up.. I love each of these, and they are all SO different!


I painted this frame in French Gray color that I mixed up myself.  The frame already had the gold on it, so I left it showing and rubbed some paint off to show more on other areas.. I love how this one came out!


I love how different this frame is below.. It turned out to be the perfect chalkboard!  I added the writing and buck on Picmonkey ;)  Love that website!


This smaller frame turned out lovely as well.. It's painted with a pretty green and then I rubbed a homemade white glaze on it.  So pretty!  


I have had this old window sitting around for months and finally layered some French Grey and a creamy white painted finish.. added the chalkboards and here she is! 


Now, onto the table!
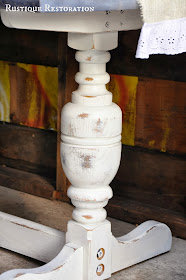
I picked up this solid wood oak trestle table last summer and finally got around to refinishing it a few days ago.  I had originally planned to do a white wash to the whole thing, but went in a completely different direction as you can see below!


I love the turned legs on this table.. they are pretty substantial and solid too!


I have some wintery decor throughout my shop now.. it's so fun to be able to change it up from season to season :)  We finally got the second wall built on my addition, now I need to paint it and the ceiling.  They will be painted a creamy white, and I'll leave one of the walls bare to show the beautiful barn wood.


Here is a console table I built a few weeks ago.  It's a chic French looking table with dainty fluted turned legs and a tea stained top with a white washed finish.  I'll post more on this table later and my building and finishing process.


This is the wall that will be painted white.  


Well, that sums it up for the latest around my shop!  I hope each and every one of you have a WONDERFUL Thanksgiving and have time to just relax with your families!  Thanks for stopping by!
 

Monday, November 18, 2013

Cinnamon Pumpkin Bread with Cream Cheese Glaze

 Mmmmm!  My house smells of fresh cinnamon spiced pumpkin!  I've never made Pumpkin Bread before, but thought I would give it a go today.. it's chilly, kind of cloudy.. the perfect kind of day to make Pumpkin Bread! 


 I absolutely love this bread recipe!  I have used  this same recipe for Zucchini Bread, Banana Bread, and now Pumpkin Bread.  I just change out whatever the main flavor is supposed to be, and it's worked for me so far!  So here she is, the easiest, most moist bread recipe:

Ingredients

3 cups all-purpose flour
1 tsp salt
1 tsp baking soda
1/4 tsp baking powder
3 tsp ground cinnamon
3 eggs
2 cups white sugar
3 tsp vanilla extract
1 cup vegetable oil
1 tsp pumpkin pie spice
1 tsp ground nutmeg
1 29 oz can of Libby's 100% Pure Pumpkin

Glaze

4 oz cream cheese, softened
1 tsp vanilla extract
1 cup powdered sugar
4 tbs milk, for thinning

For Bread

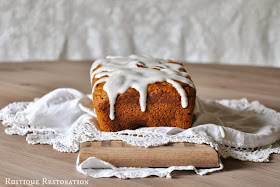
Preheat your oven to 350 degrees F.  Sift together flour, salt, soda, baking powder, cinnamon, nutmeg, and pumpkin pie spice.  In a separate bowl, beat eggs.  Add and mix well sugar, vanilla, and oil.  Add your pumpkin to the egg mixture.  Add dry ingredients, mixing really well.  Bake at 350 degrees F for 1 hour.
For Glaze

In a small mixing bowl, soften cream cheese.  Add powdered sugar and vanilla, mix well.  Thin down to a pourable consistency with milk.  Mine took about 4 tbs.  Drizzle on top of your pumpkin bread and ENJOY!


Doesn't this recipe make you want to curl up in your jammies and a blanket and sit next to a fire?  Maybe that's just me ;)  I hope you give this a try!  Thanks for stopping by as always!

Linking up at:


A Farmhouse Table and a Custom Bench

I thought I would show you all this gorgeous Farmhouse Table and Custom Bench that went to a customer a couple weeks ago.  I started with a dark stained top and black base table.  It actually wasn't bad looking at all, but we wanted the brown and white look, so let the sanding begin!! :)

Here is what I started with, although I had already gotten started and have the top completely sanded in this photo.  I sometimes forget to get that before shot! :-/


I use a palm sander to remove the finish.  Usually with an 80 grit sand paper, and then I move up to a 150 or a 180 grit sand paper before I put the stain or paint on.  You could try to use a stripper to remove the finish, but I will be honest and say that I HATE strippers with a passion.  {Maybe I should choose my words better} haha  The chemicals are stinky, and they burn you if they touch you, and I honestly feel like they take just as long to remove a finish as just sanding does.  But if you like the strippers, then feel free! haha
 

I don't always bother to get every inch of paint off if I'm going to paint over it.  And it's actually really pretty to see the layers when it's time to distress later on.  Just make sure to get any of that sheen off so your paint doesn't peel later.  As for the top, every bit of the finish needs to be removed, otherwise the stain will end up splotchy and won't take to the spots where you may have missed.

I painted the base of this table and bench in one of my favorite whites, Vintage by Valspar.  I use a flat sheen, and it only takes a couple coats to cover really well.  For the top I used the Minwax Mission Oak.  It's warm and kind of a light chocolatey honey brown.  Next I distress.  I do most of it with my palm sander, going back here and there with a sanding block until I get the look I'm after. 

I always roll on the Deft Clear Wood Finish in Satin, with a foam roller.  I like to do three to four coats on my dining tables, since they will get a lot of use and wear.  Make sure to sand in between each coat, after drying.  As for the legs and skirt of the table and benches, I use the spray form of Deft Clear Wood Finish in Satin as well.  I do this same process for all my chairs.


I built this custom bench to go with the table.. it's all out of 2X4's, so solid, sturdy and HEAVY!


Well, I hope this was helpful and you love this farmhouse table as much as I do!  Thanks for stopping by, and have a great day!


Saturday, November 2, 2013

Red Riding Hood and a Peacock Princess!

Well, Halloween turned out to be a success this year!  Cute costumes and A LOT of candy! haha.. It's always nice to build up a stash for the year!  So my original plan was to do a little mini photo shoot of the girls in their costumes a few days before Halloween, but we all ended up sick and I barely pulled out of it by Halloween evening!  So we ran down the street and took these, headed back home to grab dad and out we went!

I made this little red cape for my daughter Isabella.. I had planned to make a long matching red skirt, but the amount of material I had to work with wasn't enough.. But I am actually pleased with how it came together. We paired the red cape with a fancy white dress, and a vintage apron with red details on it.  Added a basket and a red and white plaid table cloth I picked up at the dollar store awhile ago and walla, Little Red Riding Hood!


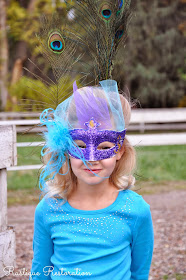
My baby girl Olivia had been planning to be a Peacock Princess months before Halloween!  So we worked together to create her costume and give her the dream she had in mind!  We had fun picking out the neat colors for her tulle skirt, and all the different things we needed to create her mask.  The original plan for her costume was to pick up a dark blue leotard for the body, but try finding something like that in a store!  Your only options are white, black, and pink! haha  But we grabbed this cute rhinestone blue shirt at Justice, so she was happy with that, and she can wear it regularly, which makes ME happy! :)


And my two baby girls together, growing up so fast..  Where have the years gone??  I just wish time would slow down a little!!  
 

I hope all of you had a fun and safe Halloween with your kiddos!  It's a fun time to be creative and spend some time together carving pumpkins, and designing costumes!  Until next time, have a great weekend, and thanks for stopping by!