Showing posts with label Fireplace Mantel. Show all posts

Saturday, December 27, 2014

OUR CHRISTMAS LIVING ROOM

Well here we are a few days after Christmas already!  I have been so busy this Holiday Season, I found no time to do my Christmas post!  So I thought I would share our Christmas living room, now that we are all probably worn out by all the Christmas posts! haha

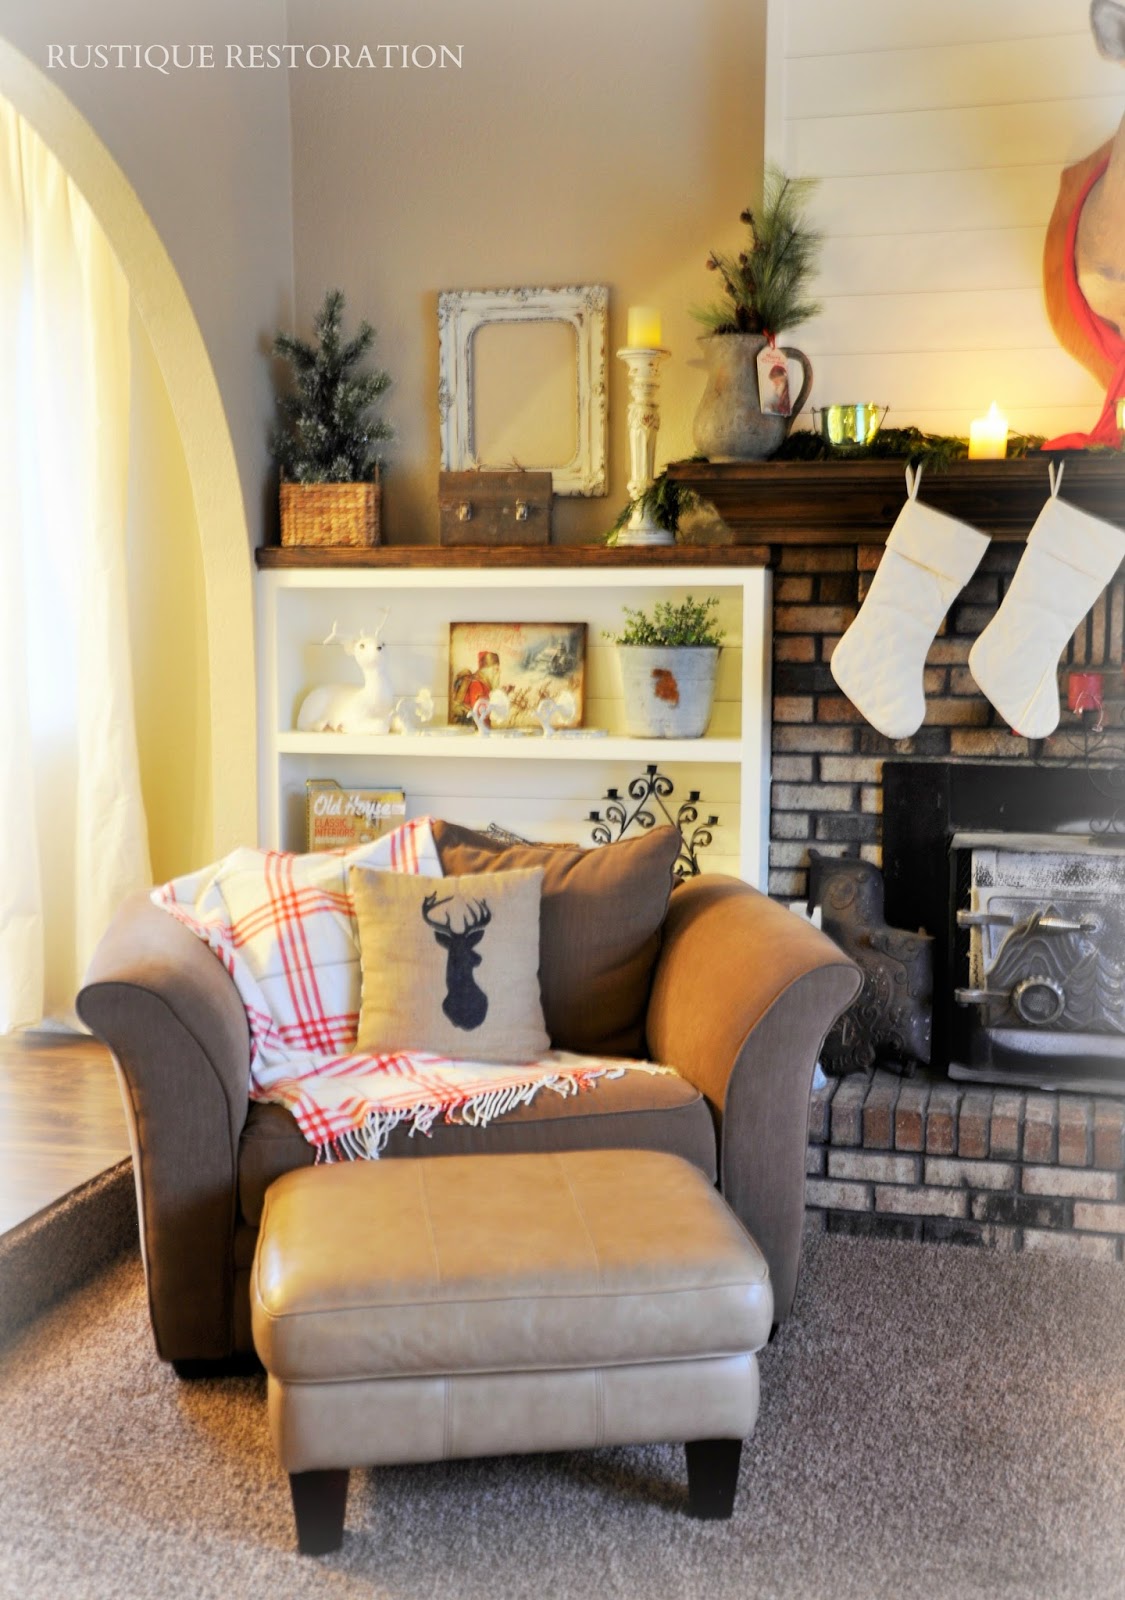
I sewed these cute plaid pillow covers.. I used material from a table cloth I found at Marshall's.

 For anyone that really knows me, it might come as a shock to see a buck hanging above my mantel.  But this year, I wanted to create a cozy chateau look and feel.  My husband thought I was teasing him when I asked him to bring the deer in from the garage.  Let's just say he was more than thrilled when he realized I wasn't! ;)  Our furry friend who joined us for Christmas this year is named "Steven".  My hubby named him years ago and our kids think his name is the funniest thing ever!  I simply draped him with one of my red scarves to give him that Christmas spirit.


I used vintage finds on the shelves.  An old lantern, cast iron fan, vintage metal buckets.. old books.. 


 I found this really neat candelabra at a thrift store!  I thought it looked very French Chateau. 

 I love this red and white plaid throw.  It's actually a blanket scarf from Old Navy!  I guess those can be very versatile ;) 

I also kept the deer silhouette pillow I made out for Christmas as it went perfectly with the theme.


This year our Christmas Tree displayed all of our family ornaments.  It's always so special every year to hang all the sweet handmade ornaments that the kids have made.  My husband and I have our own ornaments from childhood as well and I love to put those up.  Our theme this year was The Family Tree.  I layered in a pretty red and white plaid ribbon to give it that cozy country cabin look.


This year, my mother in law bought each of our girls their own Christmas Tree for their room.  My youngest daughter, Olivia, chose a really beautiful white one.. We had fun decorating them.


 My oldest daughter, Isabella, Chose this sparkly green one.  The trees added a bit of Christmas magic to their room this year.  I know it will be a great new tradition to get them out each year and decorate them.


Well, that's it for our Christmas decor this year.  I hope each of you had a wonderful Christmas holiday with your families and all have an amazing New Year!  

xo Jen

Wednesday, November 12, 2014

Living Room Reveal!! - One Room Challenge


My, oh my, oh my...  Okay, from now on... when I say check back tomorrow for my post, just come back a week later! ha!  It seems I have made a habit of this.  Problem with promising something a day later, is that I have no idea what tomorrow brings.  Unfortunately my tomorrows brought dark days, and when the sun was finally out and pouring into my living room, I was stuck away from home. So, here we are, a week later!  Thank you for your grace everyone!! :)  Moving onto the REVEAL!

If you'd like to see the process from start to finish, you can catch all the posts below.


Here's a little refresher on what we started with.


And here is what we ended up with!!!


 I did a pretty simple mantle scape this year.  I left some of the summer items up, and then incorporated the fall wreath, and porcelain pears.  

 The living room is so cozy and inviting now.  And definitely reflects my taste for style.


I'm in love with the horizontal planking we did.  It adds so much charm to the room.

And the wall that our large sofa is on is totally different now!  I built two matching farmhouse end tables to go on each side.  I will post a tutorial on these soon :) 

 I also diy'd some thrift store lamps to go on each table.  I was ready and prepared to just buy a couple new ones and spend the $150.00, but I saw these two sitting in my garage and thought, well, may as well try to be frugal where I can!!  I honestly love how they turned out.  They keep the room casual, yet elegant? 


I'm a little disappointed that my table top isn't just a touch wider.  My favorite birdcage BARELY fits!  I tried to place it in other places around the room, and it ended up back here.  I can live with it being a touch crowded. haha


I didn't have to purchase too much to accessorize this space.. Most everything I already had on hand.  The wire and metal basket on top of this shelf was new from Tai Pan.  Love that store!

I hand made the Floral Pillow Covers you see on the sofa and chair.  There are more available in my Etsy Shop!  As well as the Deer Silhouette Pillow Cover!

I used cut limbs from my own trees for the foliage in the basket, on the shelves and in the concrete pitcher.  The colors were perfect and I love the texture it brings to the space.

I didn't end up adding anything to this wall.  I just simply changed out the decor inside the birdcage.  Once the shelves were completed and staged, I realized it may be too busy to do much on this wall.

I love using architectural pieces in my decor.. Old corbels, chipped up leg posts, crates, etc.  Anything with a vintage worn look.


So there she is!  Glistening in her glory! ;)  My husband and I seriously walk in and out of this room for no reason other than to just take it all in. lol  He actually didn't even care to do anything to this room, but rolled with it to make me happy and ended up being pretty pleased himself.  Love it when that happens!


There are still a few things we need to do in here.. Like put a fresh coat of paint on the fireplace stove, and then put up a new fire screen.  Put a fresh coat of paint on the walls.  Maybe a new rug?  It would be a jute rug if I decide to put one in here.  I also didn't find the time to complete the entry way.  But the one room challenge is only "one room" right?  So oh well.. I'll get to it soon enough!  Thank you so much to Linda over at Calling it Home for hosting this challenge and encouraging all of us weekly!  We are grateful!  And thank you to all who have followed along with me and left me encouraging comments and support!  We all love and need that :)  Until next time, take care and enjoy your week! 

Thursday, October 30, 2014

One Room Challenge - Week 5

 WOW!  I can not believe we are already at the end of week FIVE!! Where has the time gone?!  I tell you what, I am going to have one busy week ahead of me.  There has been a lot of progress made, but there are still a lot of things on the list that need to be done! 

In case you missed the last several posts, here are the links so you can catch up.


Week 4 - Sorry, I missed this one! :-/

Okay, let's move onto what I accomplished over the past couple weeks.  I have two end tables built and one stained and finished.  The other one just needs to be stained.  I LOVE how these tables turned out.  I was originally going to do a more square looking one from one of Ana Whites Plans, but I decided to draft up my own idea.  I love the slanted legs and planked bottom and top.  I stained this table with one coat of Weather Oak, by Minwax, and then one coat of Provencial, by Minwax, over top of the W.O. stain.  You have to do the stains in order if you want to achieve this look.  Provencial is actually a pretty chocolatey brown if you use it first.  I sealed the table with Deft, in spray can form, in Satin.  This stuff rocks!  And it dries SO SUPER fast!  Which works great for me!

  
Seems like I've always got a photo bomber!  That is our Boston Terrier, Sadie.  :)


You can probably see the base area and that it still needs some work.  That is part of the foundation and it pops into the room about 4 1/2".  I am going to paint and trim that out this week.  It will be much more polished when I'm done with it!

Okay, next we have the bookshelves!  These play a HUGE part of my living room makeover. As you can see, there is still lot's to do on these!  I will be planking the backs today, and getting them painted up to match the top of the mantle.  I cut the mantle out of the picture because I've already started to stage it!  Didn't want to expose too much yet!  But I have to say, I am in love.  I know these shelves will rock when they are done too. 


 We pocket holed everything together, including the shelves.  I love my Kreg Jig.  Everything is so much sturdier. 


 After our plywood boxes were built, we cut our face frame pieces and glued and nailed them into place.  A face frame makes a HUGE difference.


I honestly cannot wait to show you the big reveal next week!  It's going to be so great to have this room done.  Below is my list of what needs to be finished and purchased by next Thursday!

The List


Horizontal Planks installed behind shelves
Base molding attached to shelves
Shelves Painted
Wood tops, installed and stained
Second end table stained and finished
Wiring for new light/fan, and installed
Build new console table for entry way
Finish the foundation molding
Fix Brick that is falling apart
Accessorize

Wow, okay, that was more than I even realized!  I better get to work! haha!  Be sure to check out all the other One Room Challenge linking participants at Calling It Home here!  There are a lot of really cool projects close to completion!  Thank you as always for stopping by!

xo Jen

Thursday, October 16, 2014

ONE ROOM CHALLENGE - WEEK 3


Wow, I can't believe we already on Week 3 of the One Room Challenge!  Time seems to be passing very quickly! ;)  But I still think this is an absolute blast!  I can't say enough how great it was to receive all the sweet comments and encouragement.  Thank you!  I need it!

For those of you who are just starting to follow along, I'll clue you in on the challenge!  Linda with Calling it Home is hosting the One Room Challenge, where 20 designer/bloggers are sharing their renovations over a span of six weeks, start to finish!  And Linda has opened up a linking event for all of us who would like to follow along and join the challenge!  So two weeks ago, I shared my before pictures and what my plan was.  Click here to see the post and inspiration pictures.  Last week I shared my progress, and you can click here to see that post!

This past week, the following was accomplished:

Molding was nailed onto the planking to frame it in and give it a more finished look.

  
Next, I filled all the nail holes, and calked the seams where the molding met the planks, as well as the seams where the molding met the walls and ceiling.  Much better!  I gave it three coats of paint, using Vintage by Valspar.  I get that at Lowes, and I used a semi-gloss.  I can't believe how different it looks since I painted it!  It's fresh and very cottage-farmhouse!


Here's a shot of the whole wall.  Miss Molly photo bombed on the left!  Isn't she sweet though!?  I feel like this room is already coming together, and I have so much more to do!
 

I also built my two side tables over the past couple days.  I still need to sand and stain them, but they are built!  And they are HEAVY! ;)  I will be doing a DIY on these tables after the big reveal in a few weeks!


What's on the schedule for next week (if all goes according to plan!):

*Sand, Stain, and Lacquer Side Tables
*Build Bottom Columns Below Mantle and Paint
*Start Building Bookshelves

So wish me luck everyone!  I'm having a blast with this and honestly just get plain giddy when I think of the end result!  I have walked in and out of my living room staring down my fireplace several times today!  Can't wait to see what I can accomplish by next week!  Thank you so much for visiting me today and all the encouragement!  I just love it!

xo Jen

Be sure to check out the others that are working hard on this challenge!  You can find links to their posts here!  Thanks!


Thursday, October 9, 2014

One Room Challenge - Week 2 - Progress

Well, the work has officially began!  And I honestly can't even believe it's actually happening.  I have wanted to do this for so long!!!  We gathered materials over the last several days and yesterday we took the plunge.. There's no going back now!

First I cleaned everything off the mantle and fireplace, and gave it a good vacuum.


Then we attached plywood strips on the brick, using a masonry drill bit and mason screws. This had to go up so we could nail on the planks.
We started at the bottom and worked our way up.

 I thought the top part was going to be really tricky, but it wasn't too hard to figure out the angle.


 We planked the sides as well.  The front will get a trip piece on the sides and at the top, that may get done today.  


The next step is to come up with a plan for the bottom.  I am kind of designing that part as I go.  So check back next week to see what we have added!!  Thank you for following along, and be sure to check out all the other cool One Room Challengers!  You can find them here!